

How to Talk to Cursor (Even If You've Never Coded)
Learn to prompt like an builder, not a developer

This is Part 1 of a 3-part series on building apps with Cursor.
In this first part, you’ll learn how to communicate with AI so it builds what you actually want. Part 2 covers the anatomy of a great prompt. Part 3 shows you real workflows to go from idea to shipped product.
You’ve opened Cursor. You’ve got an idea. You type something like “make a login page” and hit enter.
Cursor spits out code. It looks like a login page. But it’s not quite right. The button’s in the wrong place. The colors are off. The form fields aren’t what you needed.
You try again. “Add a signup option.” Cursor makes changes but now something else broke.
This is the wall most non-technical people hit with AI code editors. Not because Cursor is bad. But because nobody taught them how to talk to it.
Cursor isn’t a mind reader. It needs context. Your job isn’t to write code, it’s to describe what you want clearly enough that Cursor can build it.
This article will show you exactly how to communicate with Cursor so it builds what you actually imagined, not what it thinks you want.
The Problem: You’re Describing, Not Instructing with Context
Most people approach Cursor like they’re explaining an idea to a friend:
“I want a homepage with a hero section and some features listed below.”
That’s a description. And descriptions leave too much open to interpretation.
Cursor doesn’t know:
What size should the hero be?
Where should the text sit?
What do the feature cards look like?
How should they be arranged?
So it guesses. And guesses lead to outputs that are generic and require endless back-and-forth to fix.
The shift you need to make: Stop describing. Start instructing with context.
Instructions are specific. They tell Cursor what to build, where to put it and how it should behave.
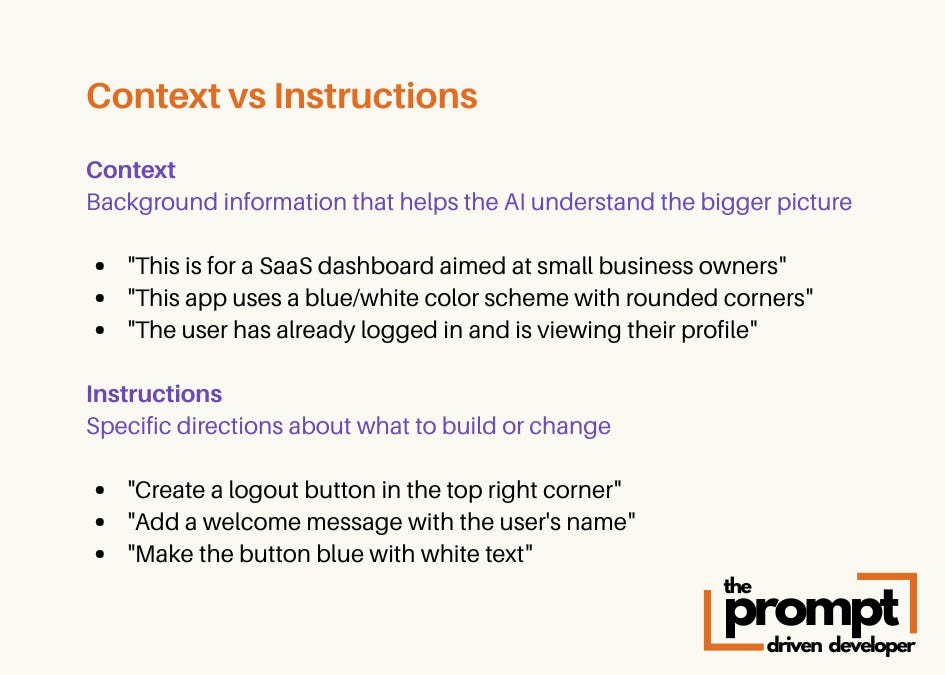
The Context Stack Method: Giving Cursor the Full Picture
Here’s a prompt structure that works almost every time. It combines context (background information) with instructions (specific directions).
Let’s break it down with an example:
Bad Prompt: “Add a pricing section.”
Good Prompt (Context + Instructions):
[Context]
This is for potential customers comparing plans on our SaaS landing page.
The site uses a clean, modern style with blue accents and rounded corners.

[Instructions]
Add a pricing section below the features with three pricing cards arranged horizontally.

Each card includes:
- Plan name at top (Basic, Pro, Enterprise)
- Price in large, bold text
- List of 5 included features
- “Choose Plan” button at bottom
- Highlight the Pro plan with a blue border
This gives Cursor:
Context (who it’s for, what the existing style is)
Placement (where it goes)
Structure (how it’s organized)
Content (what’s inside)
Style cues (visual details)
The context helps Cursor make better decisions. The instructions tell it exactly what to build.
The 3 Types of Prompts Cursor Responds to Best
Now that you understand the Context and Instructions framework, let’s look at the three types of instructions Cursor responds to best: Structure, Modification and Behavior.
1. Structure Prompts: Building the Layout
Use these when you’re creating something new or defining how a page should be organized.
Example prompt:
[Context]
This is the homepage hero for a no-code app builder.
Target audience: non-technical founders who want to build apps.

[Instructions]
Create a full-width hero section at the top of the page:
- Large heading centered: “Build Apps Without Code”
- Subheading below it: “Learn to use AI as your development partner”
- Primary CTA button below the subheading: “Start Building”
- Background: soft blue gradient
Notice what this does:
- It defines what goes where
- It specifies size (full-width, large heading)
- It gives actual content (not “add a heading” but the exact text)
- It sets visual details (colors, layout hierarchy)
Cursor now knows exactly what to build. No guessing involved.
ℹ️ Not every prompt needs heavy context. Modification and Behavior prompts often work fine with minimal context since they’re editing something that already exists.
2. Modification Prompts: Fixing What’s There
Use these when something exists but needs tweaking.
Bad modification prompt: “Make the button look better.”
Good modification prompt:
Change the CTA button:
- Background color is bright blue (#3B82F6)
- Text is white, bold, 18px
- Add 16px padding inside the button
- Rounded corners with 8px
- Add a subtle shadow on hover
The difference is you’re not asking Cursor to guess what “better” means. You’re giving it specific instructions it can execute.
Even if you don’t know CSS, you can describe:
“I want the button to have rounded edges, be blue, with white text and lift slightly when I hover over it.” Cursor translates that into working code.
3. Behavior Prompts: Defining Interactions
Use these when you want something to do something.
Example prompt:
When the user clicks the “Start Building” button:
- Open a modal window in the center of the screen
- Modal has a signup form with fields: Name, Email, Password
- Add a “Submit” button at the bottom
- Close the modal when the user clicks outside of it
You’re describing the user journey. Cursor understands “when X happens, do Y.” You don’t need to know JavaScript event listeners, you just need to describe the flow.
How to Describe What You Want Without Technical Terms
The biggest myth about prompting AI tools: you need to be technical. You don’t.
You need to be specific, not technical.
Here’s how to describe common things in plain English:
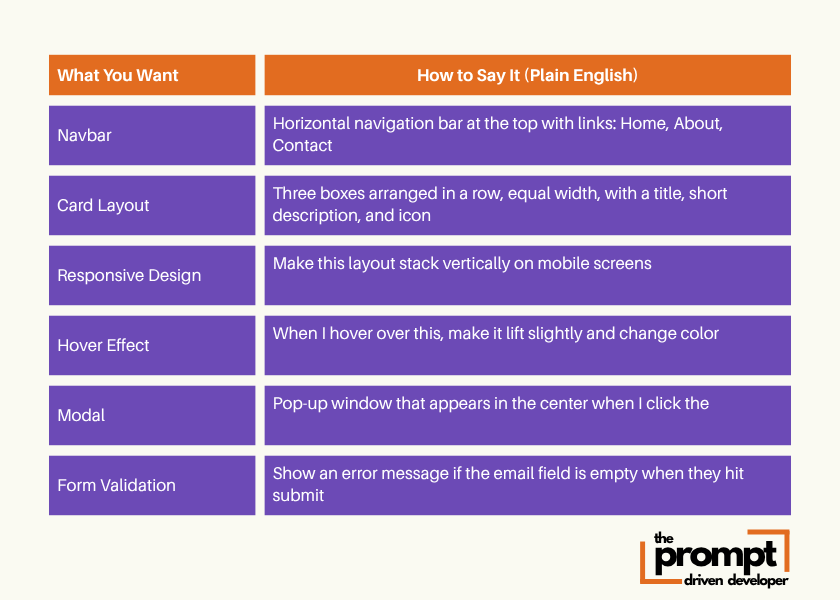
Notice a pattern? You’re describing:
1. What it is (a box, a button, a form)
2. Where it goes (top of the page, center, in a row)
3. What it does (opens, changes color, shows a message)
That’s it. No coding or technical language required.
Iterating When Cursor Gets It Almost Right
Cursor won’t always nail it on the first shot. That’s normal. The key is knowing how to iterate without starting over.
(i) Use Modification Prompts on Specific Elements:
Instead of: “Redo the hero section.”
Try a prompt like:
In the hero section:
- Move the CTA button 32px lower
- Change the heading text to “Start Building Today”
- Reduce the background opacity to 70%
You’re making surgical edits. No need to demolish and rebuild.
(ii) Reference What Already Exists:
Cursor has memory of what it built. Use that.
Example prompts:
Make the About page hero match the homepage hero—same layout, different heading text.Use the same button style from the pricing cards on this form.This keeps your design consistent and saves you from re-explaining styles every time.
The 3 Phrases That Make Cursor Build Cleaner Code
Certain phrases guide Cursor toward better decisions:
1. “Use consistent spacing of [X]px throughout”
Keeps your layout from looking amateur
2. “Follow the same structure as [existing component]”
Maintains design consistency across pages
3. “Make this responsive so elements stack vertically on mobile”
Ensures your app works on all screen sizes
You don’t need to write code. But you do need to set guardrails so Cursor doesn’t go rogue.
Real Example: Before & After
Let’s see this in action.
Before (Vague Prompt):
Build a contact form. What Cursor Builds: A generic form. Two fields. A button. It works (maybe!) but it’s bland and doesn’t match your app’s style.
After (Structured Prompt):
Create a contact form in the center of the page with:

Layout:
- White card with soft shadow
- 40px padding inside
- Rounded corners (12px)

Form Fields:
- Name (text input)
- Email (text input)
- Message (large text area, 4 rows tall)
- All fields have placeholder text and subtle gray borders

Button:
- “Send Message” button at bottom
- Blue background (#3B82F6), white text
- Full width of the form
- Rounded corners (8px)

Behavior:
- Show a green success message below the button when submitted
- Clear the form after submission
What Cursor Builds: Exactly what you described. Professional. Polished. Ready to use.
Your Prompts Are Your Blueprints
Think of prompts like blueprints for a house. The more detail you give upfront, the less rework you do later.
You don’t need to know how to code. You need to know how to communicate structure, placement and behavior in plain English. That’s the skill that matters now.
Start practicing with small prompts. Build a button. Then a card. Then a section. Then a page.
Coming Next:
Now that you know how to talk to Cursor, Part 2 will show you what makes a prompt actually work. The invisible structure behind every great output.
You’ll learn the 5 core components every strong prompt needs, how to add constraints that prevent messy code and the exact templates I use to build features that work the first time.
See you in Part 2 👋
The Prompt Driven Developer